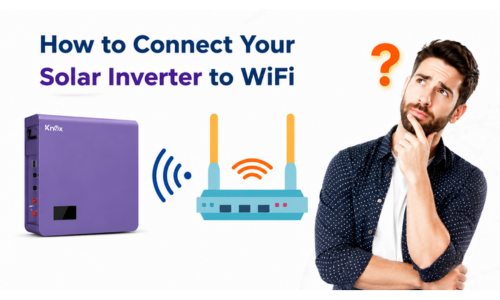
Your solar panels are generating power but are you watching it happen in real time?
Electricity bills in Pakistan are rising every single year. One of the smartest decisions any solar owner can make is to connect their Knox inverter to Wi-Fi and monitor their system live from their smartphone. If your Knox inverter is running without a Wi-Fi connection right now, you are missing out on real-time data, instant fault alerts, and the ability to catch problems before they cost you money.
The great news is that the entire setup process takes less than 15 minutes and requires zero technical background. This guide walks you through all 8 steps using the exact KNOXHYBRID app screens the same ones you will see on your own phone.
What You Need Before You Start
Before beginning the setup, keep these three things ready:
Your Knox hybrid inverter must be powered on and running. You need your home Wi-Fi router name and password written down somewhere. And you need your smartphone with internet access to download the app. One critical thing to know before you touch anything: Knox hybrid inverters only support 2.4GHz Wi-Fi networks. If your router broadcasts both a 2.4GHz and a 5GHz network, always connect to the 2.4GHz one. Using the 5GHz band will cause the connection to fail every single time, no matter how many times you retry.
Step 1 : Download the KNOXHYBRID App
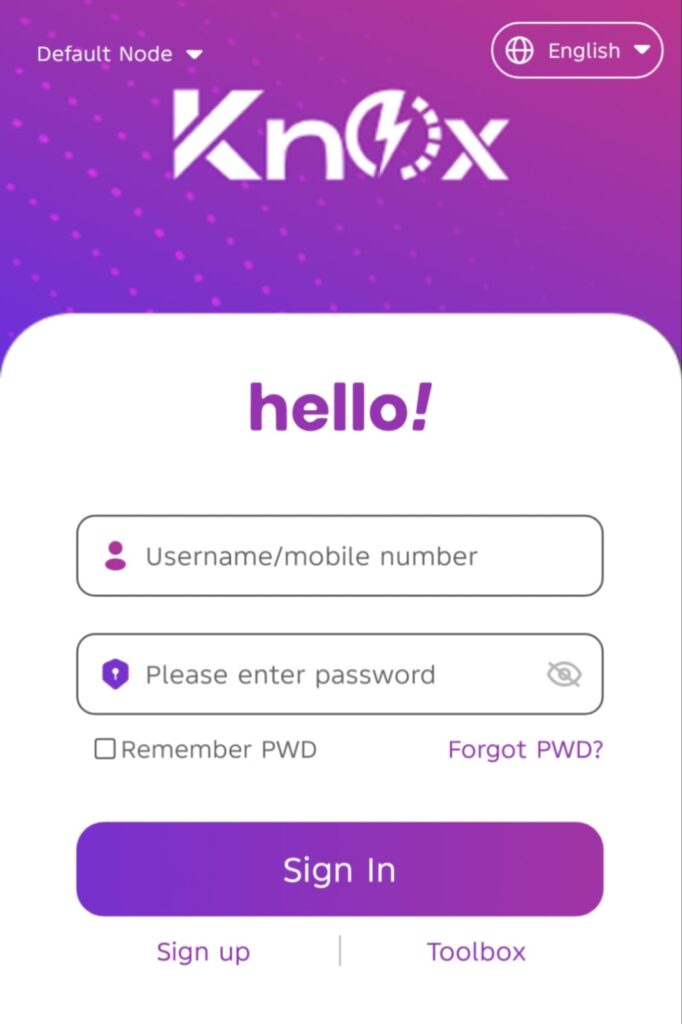
Go to the Google Play Store or Apple App Store and search for KNOXHYBRID. Download and install the app and it is completely free. Once installed, open it and you will land on the Knox login screen. You will see the purple Knox logo at the top, a friendly “hello!” greeting below it, and two input fields one for your username or mobile number and one for your password.
If you already have a KNOXHYBRID account from a previous setup, simply enter your credentials and tap Sign In. If this is your first time using the app, do not tap Sign In instead look at the bottom of the screen and tap Sign up to create a brand new account.
Step 2 : Create Your Account
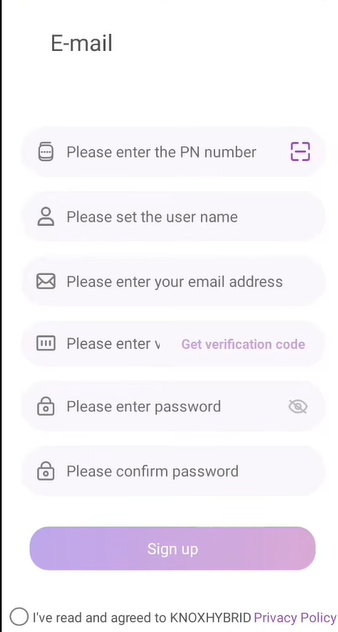
After tapping Sign up, the app takes you to an E-mail registration form. This screen has several fields and each one is important. Here is exactly what to enter in each field:
The first field asks for your PN Number. This is the most important piece of information in the entire setup. The PN number is a unique serial code printed on a sticker placed on top of your Knox inverter hardware. Look at your physical inverter unit, find the sticker on top, and read the number carefully. You can either type it manually into the field or use the small scan icon on the right side of the field to scan it with your camera which is much faster and more accurate.
The second field asks you to set a username. Choose something unique and easy to remember. This will be your display name inside the app.
The third field asks for your email address. Use an email account that you actively check on your phone, because the app will send a verification code to this address and you cannot complete registration without it. Do not use a rarely checked email or an old one you cannot access.
The fourth field is for the verification code. After filling in your email, tap the “Get verification code” button that appears in purple text on the right side of this field. Check your email inbox within the next few minutes you will receive a 6-digit code from KNOXHYBRID. Enter that code into this field.
The fifth and sixth fields are for your password and confirm password. Set a strong password that combines letters and numbers. Write it down somewhere safe because you will need it every time you log into the app. Re-enter the exact same password in the confirm password field below.
Once all six fields are filled correctly, tick the checkbox that says “I’ve read and agreed to KNOXHYBRID Privacy Policy” at the bottom of the screen, then tap the purple Sign Up button. Your account will be created instantly and you will be logged into the app.
Step 3 : Scan the PN Number from Your Inverter
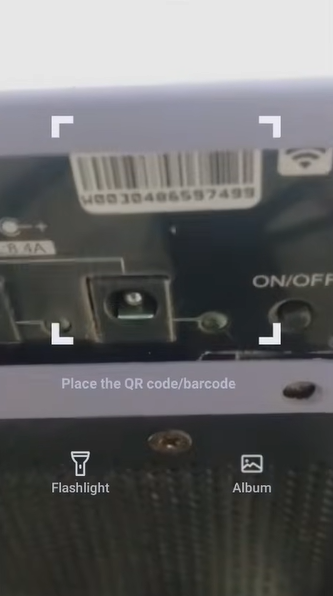
If you found it difficult or confusing to read and type the PN number manually in Step 2, the KNOXHYBRID app gives you a much easier option. When you tap the scan icon next to the PN number field, your phone camera opens with a scanning frame in the center of the screen. At the bottom it shows the instruction: “Place the QR code/barcode.”
Simply hold your phone camera close to the barcode or QR code sticker printed on top of your Knox inverter and align the code inside the scanning frame on your screen. The app reads it automatically in less than a second and fills in the entire PN number for you without any manual typing. This method eliminates the risk of making a mistake with the long serial number and is the recommended approach for most users.
Step 4 : Tap on Wi-Fi Config Button
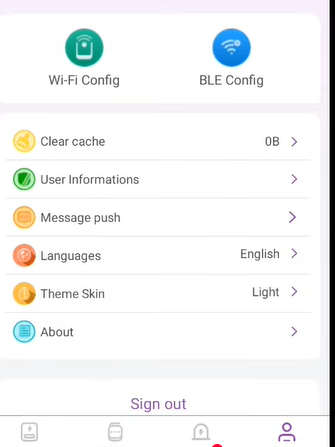
Once you are successfully logged into the KNOXHYBRID app, you need to navigate to the settings section. Look at the bottom of the app screen there is a row of navigation icons. Tap the person/profile icon in the bottom-right corner to open the settings page.
On this settings page you will see two large colorful buttons at the very top of the screen. The green button on the left says Wi-Fi Config and the blue button on the right says BLE Config. Below these buttons you will also see options like Clear cache, User Informations, Message push, Languages, Theme Skin, and About.
Tap the green Wi-Fi Config button on the left. This is the button that starts the actual Wi-Fi connection process between your inverter and your home network. Do not tap BLE Config that is a different type of connection and is not needed for standard home Wi-Fi setup.
Step 5: Turn Wi-Fi On, and Connect to the Inverter Dongle
This is the step where most people get confused and give up. Follow it carefully and your setup will work perfectly.
After tapping Wi-Fi Config in the app, exit the app for a moment and go to your phone’s main settings. Find the Mobile Data option and turn it off completely. This is essential because as long as mobile data is on, your phone will not properly connect to the inverter’s local Wi-Fi network.
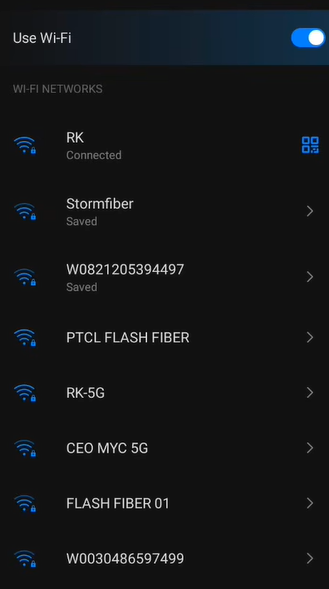
Now turn your phone’s Wi-Fi on if it is not already on. Your phone will scan and show you a list of all available Wi-Fi networks nearby. Look through this list carefully. You will see your home router networks, your neighbors’ networks, and among them you will find a network whose name starts with “W” followed by a long number for example W0821205394497 or W0030486597499. This strange-looking network name is the Wi-Fi hotspot being broadcast by the Wi-Fi dongle that is physically plugged into your Knox inverter’s communication port.
Tap on this dongle network to connect to it. No password is required for this connection it will connect automatically. Once your phone shows “Connected” under this network name, go back to the KNOXHYBRID app to continue.
Step 6 : The App Shows “Connect Ready”
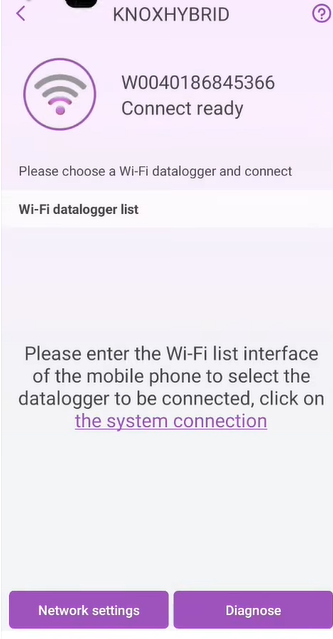
As soon as your phone connects to the inverter dongle network in Step 5, the KNOXHYBRID app will automatically detect the connection and display a new screen. At the top of this screen you will see “KNOXHYBRID Connect ready” written clearly, along with your datalogger number shown underneath. The screen also shows the message: “Please choose a Wi-Fi datalogger to be connected.”
At the bottom of this screen there are two buttons side by side. The left button says Network settings and the right button says Diagnose.
Tap the Network settings button on the left. This takes you to the screen where you will enter your home router’s details. The Diagnose button can be used later if you face any issues with the connection, but for initial setup always go to Network settings first.
Step 7 : Enter Your Home Router Name and Password
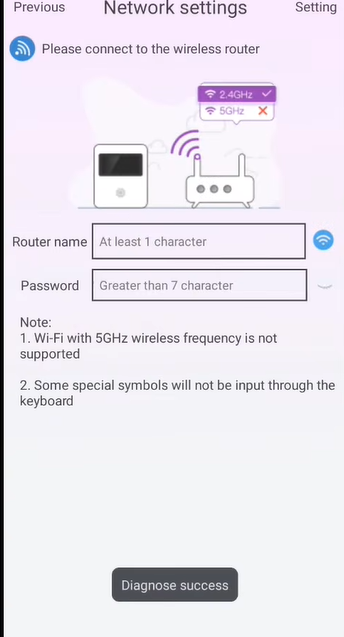
On the Network Settings screen you will see a simple form with two fields. The first field is labeled Router name — type your home Wi-Fi network name exactly as it appears in your phone’s Wi-Fi list. Make sure you are entering the 2.4GHz network name and not the 5GHz one. If both have the same name on your router, log into your router settings and rename them separately so you can tell them apart.
The second field is labeled Password type your home Wi-Fi password carefully. Pay close attention to capital letters, numbers, and any special characters. A single wrong character will cause the connection to fail and you will have to repeat the process.
You will also notice a small note on this screen reminding you that Wi-Fi with 2.4GHz wireless frequency is required, and that some special symbols may not be supported in the hotspot name. Keep this in mind when entering your details.
Once both fields are filled correctly, tap the Confirm remote button or the connect button at the bottom. The app will send your home Wi-Fi credentials directly to the inverter’s dongle. The dongle will use these credentials to connect itself to your home router. This happens within seconds.
After tapping confirm, turn your mobile data back on so your phone has internet access again. The app needs internet to fetch your inverter’s data from the Knox cloud server and display it on your dashboard.
Step 8 — Setup Complete — Live Data Appears on Your Dashboard
Within 4 to 5 minutes of completing Step 7, your Knox inverter will fully connect to your home network and begin sending live performance data to the KNOXHYBRID app servers. Go back to the main dashboard screen of the app.
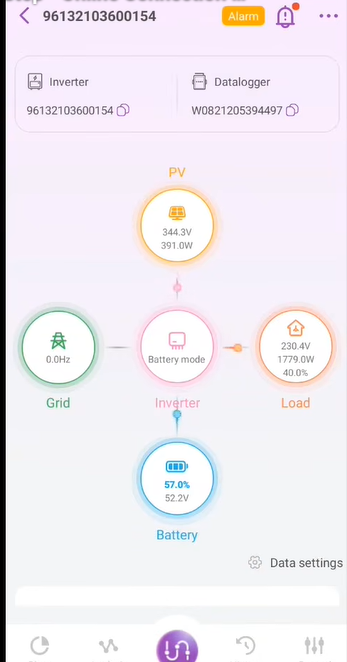
You will now see your inverter’s complete live monitoring data displayed in a clean circular flow diagram. Here is what each section of the dashboard shows:
At the top is PV this shows the solar panels’ current output voltage and power in watts. For example, 344.3V and 391.0W means your panels are currently producing 391 watts of power.
In the center is Inverter this shows the current operating mode such as Battery mode, Grid mode, or Solar mode depending on your system’s current state.
On the left is Grid this shows the grid frequency in Hz. When the grid is off or disconnected, it shows 0.0Hz.
On the right is Load this shows how much power your home appliances are currently consuming. For example, 230.4V and 1779.0W at 40.0% means your home is using 1779 watts right now.
At the bottom is Battery this shows your battery’s current charge percentage and voltage. For example, 57.0% at 52.2V tells you your battery is just over half charged.
At the very top of the dashboard screen you will also see your Inverter serial number on the left and your Datalogger ID on the right for reference. If any fault or warning is detected by the system, an orange Alarm button will appear at the top of the screen tap it to read the exact fault description and take action.
Your Knox inverter Wi-Fi setup is now 100% complete. From this point forward, the app updates automatically and you will receive push notifications on your phone whenever something needs your attention.
Quick Troubleshooting
App shows no data after completing setup: Make sure you turned your mobile data back on after Step 7. The app needs internet to pull data from Knox’s cloud server. Without mobile data or a separate Wi-Fi connection, the dashboard will stay blank.
Cannot find the dongle network in Step 5: The Wi-Fi dongle must be properly and firmly plugged into the communication port on your Knox inverter. If the dongle is loose or not inserted correctly, it will not broadcast any network. Check the physical connection first.
Entered wrong password in Step 7: Go back to Step 5, reconnect to the dongle network, return to the app, tap Network settings again, and re-enter the correct password. Common mistakes include wrong capitalization or confusing the letter O with zero.
Net LED blinking every 0.6 seconds: The inverter is not connected to your home router. This means either the wrong password was entered in Step 7 or the router signal is too weak at the inverter’s location. Try repeating Steps 5 through 7, and if the problem continues, move your router closer or add a Wi-Fi signal extender.
SRV light is off on the inverter panel: The inverter has connected to your router but cannot reach the Knox cloud server. This usually means your internet connection itself is down. Check that your router has working internet, then wait a few minutes for the inverter to reconnect automatically.
LED Indicator Reference
| LED Light | Status | What It Means |
| PWR | Solid ON | Inverter is powered on normally |
| NET | Blinks every 3 seconds | Connected to your home router |
| NET | Blinks every 0.6 seconds | Not connected — redo Wi-Fi config |
| SRV | Solid ON | Connected to Knox cloud server |
| SRV | OFF | No server connection — check internet |
Final Thoughts
Connecting your Knox hybrid inverter to Wi-Fi is a one-time process that takes less than 15 minutes and delivers value every single day for the entire life of your solar system. Once connected, you have complete real-time visibility over everything how much solar power your panels are producing, how much your home is consuming, what percentage your battery is sitting at, and whether you are drawing from the grid or running fully on solar. All of this is visible from anywhere in the world, directly on your phone.
Follow all 8 steps exactly as described above, and your Knox inverter will be live and fully monitored within minutes. If you get stuck at any specific step, drop your question in the comments below and we will walk you through it.
